
How to Migrate a WordPress Site: Zero-Downtime Tutorial (2026)
How to migrate a WordPress site without breaking it: back up everything first, transfer files with rsync or SFTP, import the database with mysqldump, fix the URLs with WP-CLI search-replace, and lower DNS TTL before you flip the A record. Total elapsed time is one to three days. Visitor downtime should be zero. The only thing that breaks is the old hosting bill.
This tutorial walks through every step with real Bash, WP-CLI, and rsync commands. The example assumes you are moving from a cPanel-based shared host to a VPS or managed WordPress host with SSH access. The principles work for any WordPress migration; the commands work directly on any managed host that gives you SSH access, so check your plan’s documentation before you start.
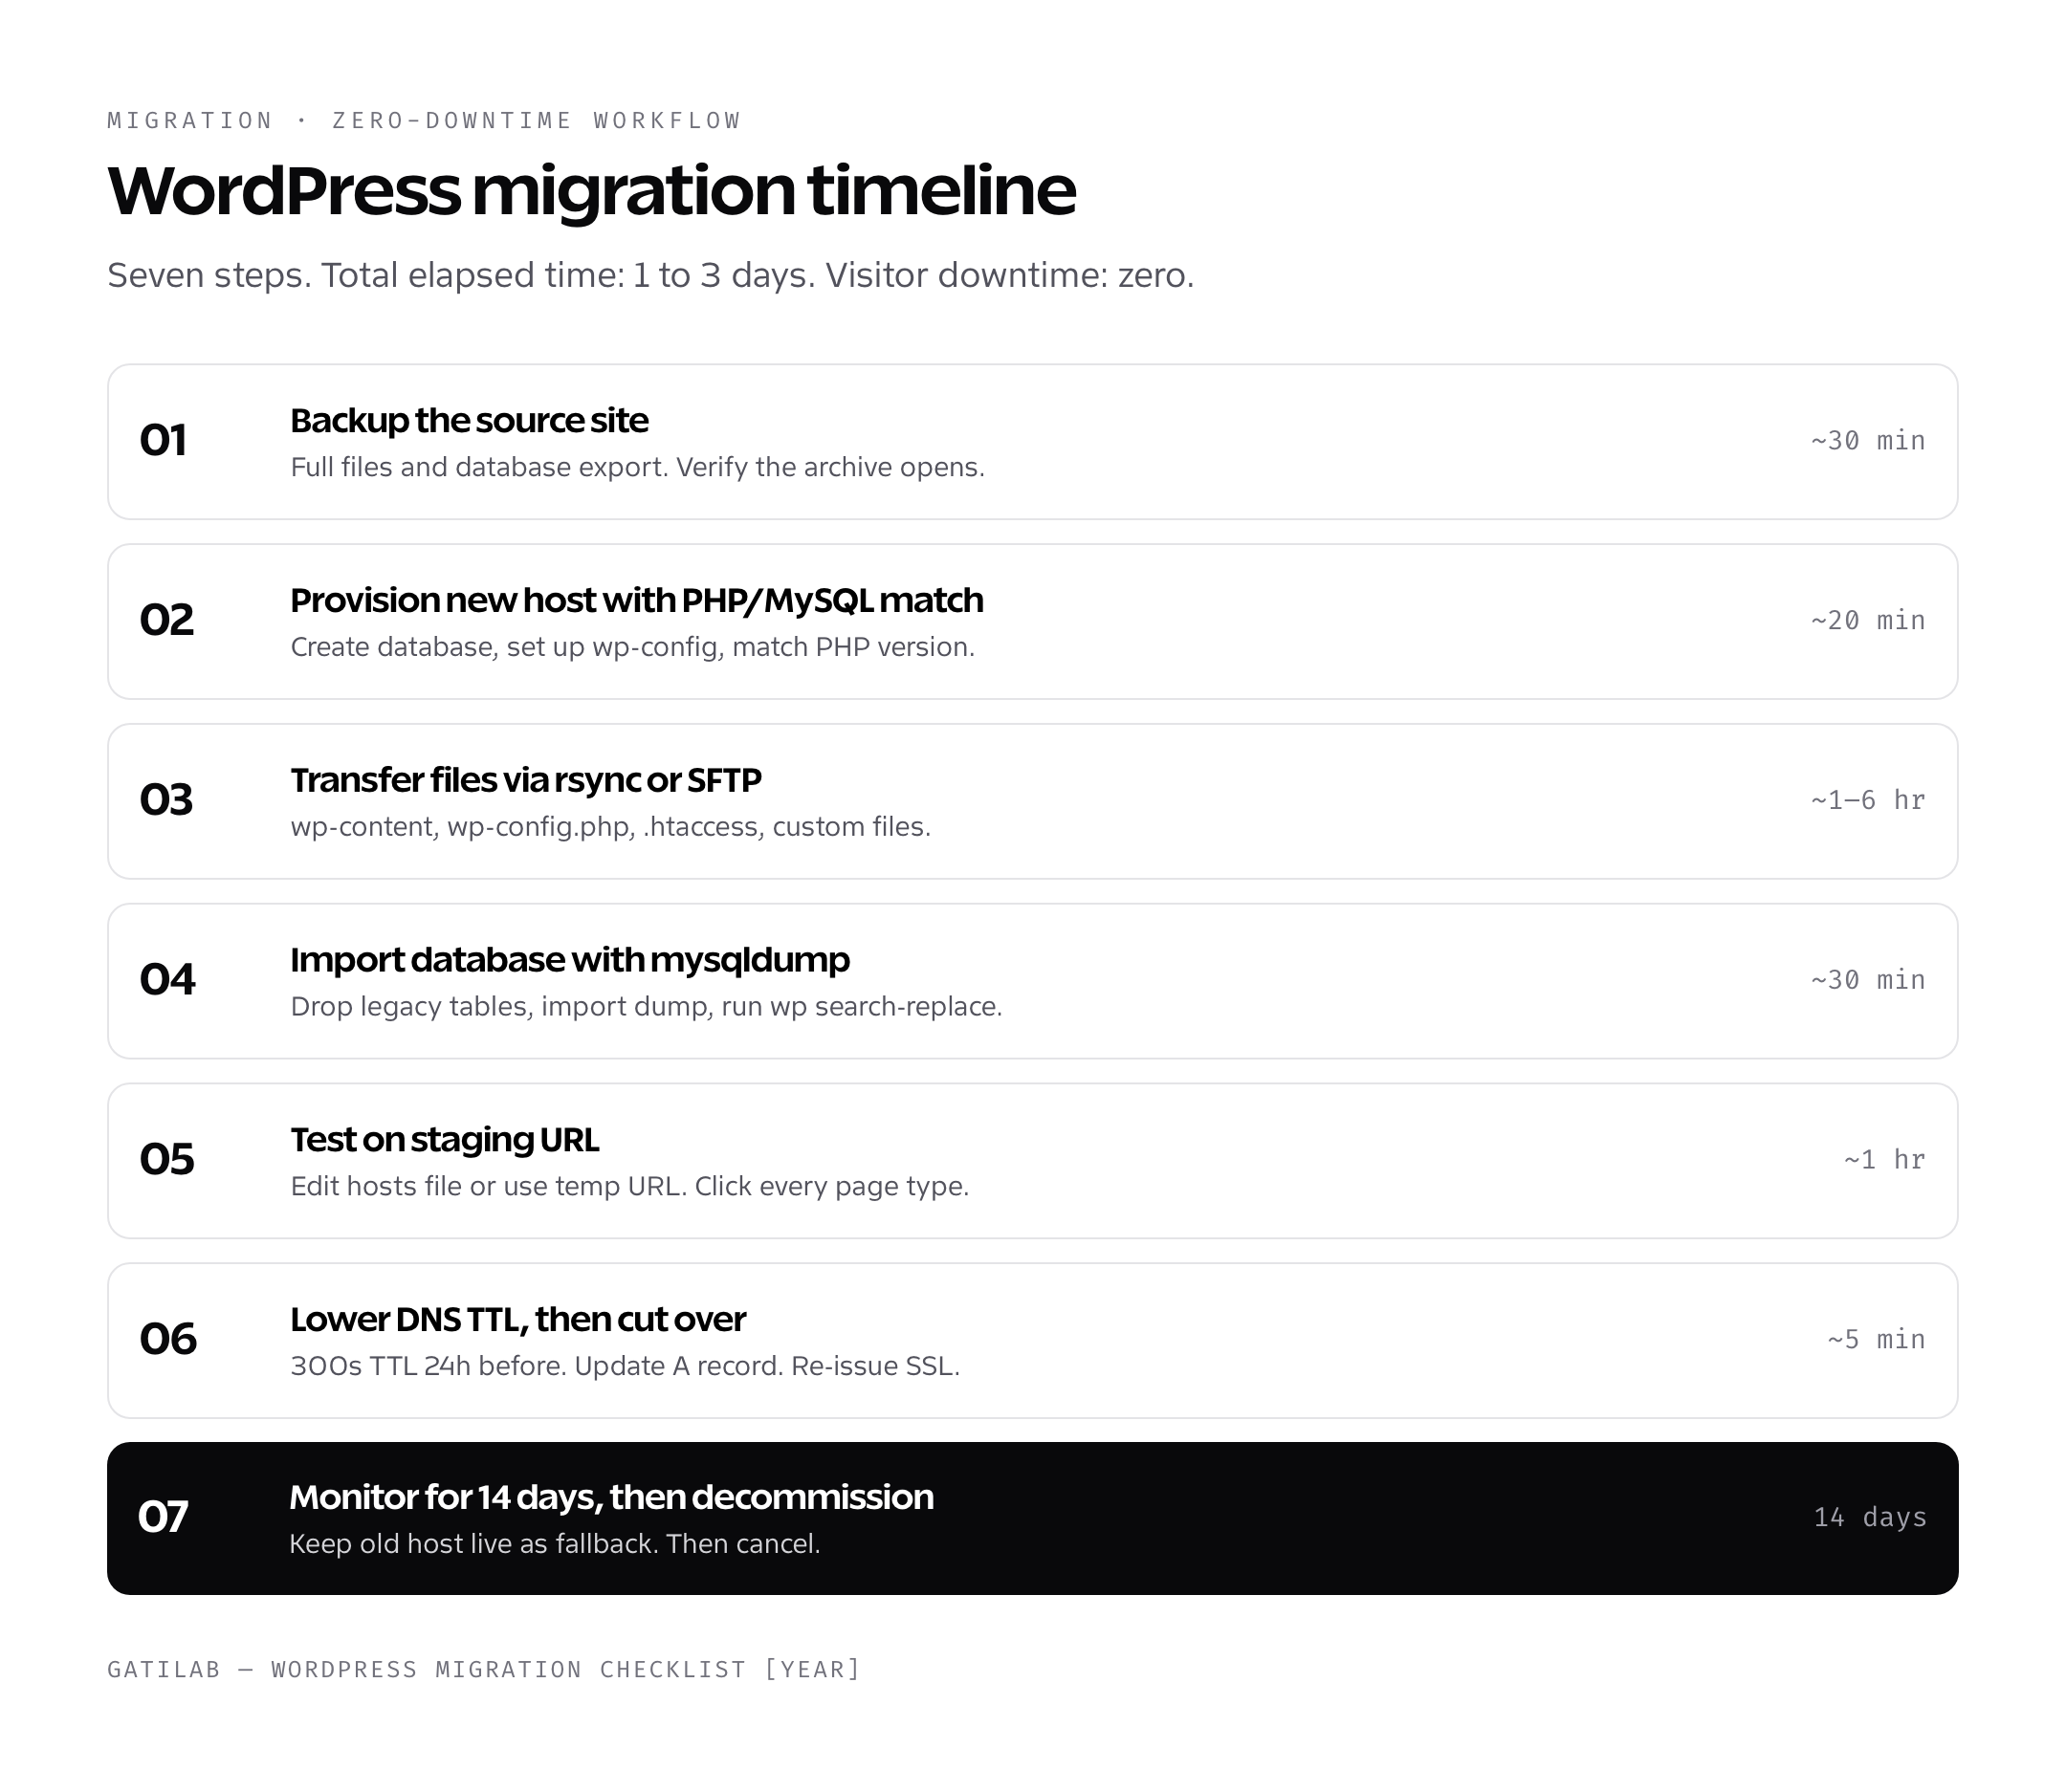
Three ways to migrate a WordPress site
Before the manual workflow, know which path fits your case. There are three legitimate ways to migrate a WordPress site, and the right one depends on how much control you have over the new host and how big the site is.
- Free team-handled migration from the new host. Easiest path; works for nearly any size. Kinsta and Rocket.net list unlimited free migrations, Cloudways migrates your first site free, and WP Engine’s Essential plan includes a free automated migration plugin.
- Migration plugin path like All-in-One WP Migration, Duplicator, or Migrate Guru. Duplicator Lite advertises backups without size limits (but no multisite support), and Migrate Guru is free for sites up to 200 GB. Quick to run, works with any host that allows plugin installs.
- Manual SSH migration with rsync, mysqldump, and WP-CLI. The path this tutorial covers. Works for any size, gives you total control, requires command-line comfort. Use it when the migration plugin times out or you need surgical control over the move.
For most readers running a small to medium WordPress site, the team-handled path is the right choice. The manual path below is for sites where the plugin path fails (very large sites, complex multisite, custom database tables) or for engineers who want to know exactly what’s happening at every step. Either way, the prerequisites are the same.
Pre-migration checklist: what to do before you start
Five minutes of pre-migration prep saves hours of debugging later. Run through this list before you touch a single file.
- Update WordPress core, themes, and plugins to the latest stable versions on the source site
- Disable WordPress maintenance mode plugins; they will block migration
- Clear all cache plugins (WP Super Cache, W3 Total Cache, LiteSpeed Cache) to avoid migrating stale HTML
- Document your active plugins, custom cron jobs, and any non-default .htaccess rules
- Verify SSH access to the new host and confirm PHP version matches (or is newer than) the source
- Lower your domain’s DNS TTL to 300 seconds at least 24 hours before cutover
- Generate a fresh full backup; download it locally as a safety net
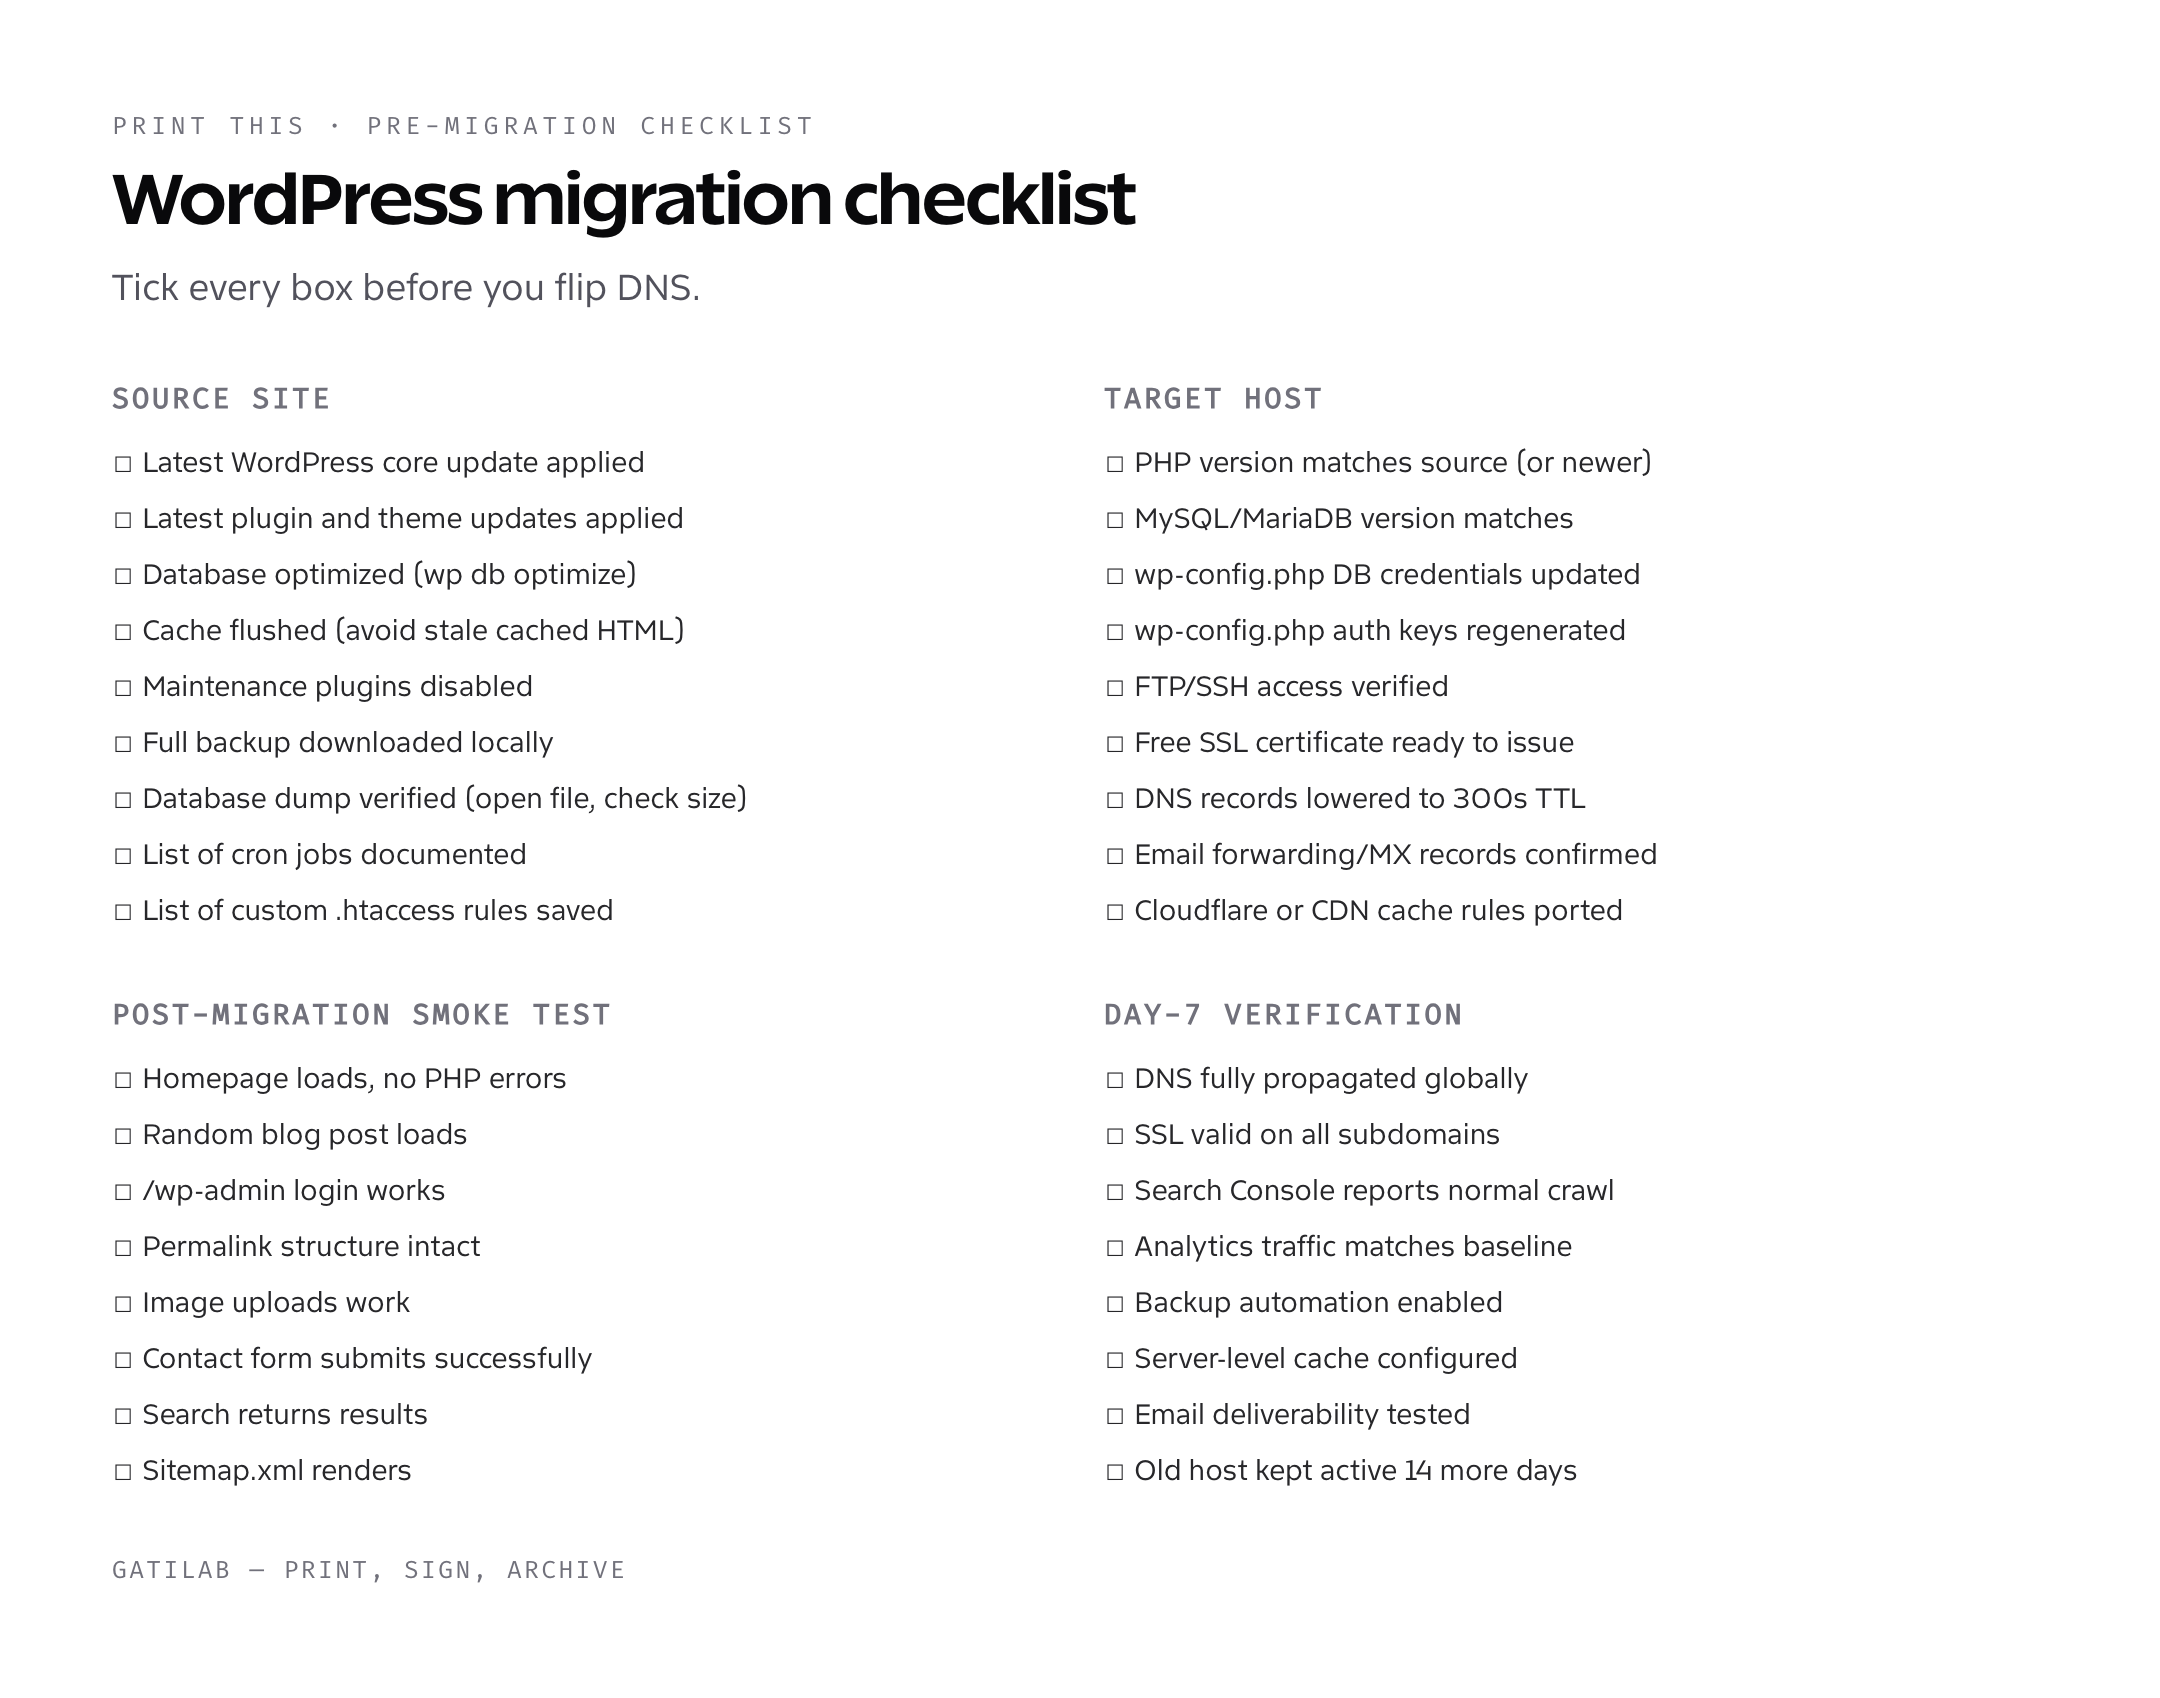
The downloadable checklist above covers source-side prep, target-host prep, post-migration smoke tests, and day-7 verification. Print it before any migration; tick every box before you flip DNS.
Step 1: Back up the source WordPress site
The first rule of any WordPress migration: backups before changes. SSH into the source host, archive wp-content and wp-config.php, dump the database, and download both files locally. If anything goes wrong in the next two hours, you can restore the source site from these archives.
# SSH into the source host
ssh user@source-host.com

# Move into the document root
cd ~/public_html

# Archive WordPress files (excluding wp-content/cache for size)
tar --exclude='wp-content/cache' --exclude='wp-content/uploads/cache' \
    -czf /tmp/wp-files-$(date +%Y%m%d).tar.gz .

# Read DB credentials from wp-config.php
DB_NAME=$(grep DB_NAME wp-config.php | cut -d "'" -f 4)
DB_USER=$(grep DB_USER wp-config.php | cut -d "'" -f 4)
DB_PASS=$(grep DB_PASSWORD wp-config.php | cut -d "'" -f 4)
DB_HOST=$(grep DB_HOST wp-config.php | cut -d "'" -f 4)

# Dump the database
mysqldump --single-transaction --quick --add-drop-table \
    -h "$DB_HOST" -u "$DB_USER" -p"$DB_PASS" "$DB_NAME" \
    | gzip > /tmp/wp-db-$(date +%Y%m%d).sql.gz

# Verify file sizes are reasonable
ls -lh /tmp/wp-*-$(date +%Y%m%d)*
The mysqldump flags matter. --single-transaction creates a consistent snapshot without locking tables (essential for live sites). --quick streams rows instead of buffering in memory (handles large databases). --add-drop-table includes DROP TABLE statements so the import on the new host is idempotent.
Verify the database dump opens and contains real data before you proceed. Run zcat /tmp/wp-db-*.sql.gz | head -100 and confirm you see CREATE TABLE statements for wp_posts, wp_postmeta, wp_options. An empty or truncated dump is the most common silent failure mode for WordPress migrations.
Step 2: Provision the new host with matching versions
Set up WordPress on the new host. The PHP version on the new host must match or be newer than the source. The MySQL or MariaDB version must be compatible with your dump. WordPress.org currently recommends PHP 8.3 or greater and MySQL 8.0 or MariaDB 10.11 or greater, per its official requirements page.
# SSH into the new host
ssh user@new-host.com

# Confirm PHP version
php -v
# Should match or exceed the source PHP version

# Confirm MySQL/MariaDB
mysql --version

# Create the empty database (skip if managed host did it for you)
mysql -u root -p << EOF
CREATE DATABASE wp_target CHARACTER SET utf8mb4 COLLATE utf8mb4_unicode_ci;
CREATE USER 'wp_user'@'localhost' IDENTIFIED BY 'strong_password_here';
GRANT ALL PRIVILEGES ON wp_target.* TO 'wp_user'@'localhost';
FLUSH PRIVILEGES;
EOF
If the new host already has a fresh WordPress install (most managed WP hosts do), drop the existing wp_posts, wp_options, etc. tables before importing your dump. The --add-drop-table flag in your mysqldump handles this automatically when you import.
Step 3: Transfer files with rsync
rsync is the right tool for transferring WordPress files between hosts. It is faster than SFTP for many small files (which is exactly what wp-content/uploads is), supports resume on interruption, and handles permissions correctly. Run rsync from the new host, pulling from the source.
# From the new host, pull wp-content from source
rsync -avz --progress \
    --exclude 'wp-content/cache/' \
    --exclude 'wp-content/uploads/cache/' \
    --exclude '.git/' \
    -e "ssh -p 22" \
    source-user@source-host.com:~/public_html/wp-content/ \
    ~/public_html/wp-content/

# Pull wp-config.php (will edit DB creds in Step 4)
scp source-user@source-host.com:~/public_html/wp-config.php \
    ~/public_html/wp-config.php.source

# Pull custom .htaccess if you use any custom rules
scp source-user@source-host.com:~/public_html/.htaccess \
    ~/public_html/.htaccess.source
For large media libraries, this can take hours depending on bandwidth. rsync’s --progress flag shows transfer speed live. If it gets interrupted, re-run the same command and rsync will skip already-transferred files. The -z flag enables compression in transit; for already-compressed files like JPGs, drop it for a small speedup.
Step 4: Import the database with mysqldump and fix URLs
Transfer the database dump, import it on the new host, and run a search-replace to fix the site URL. WP-CLI’s search-replace is the right tool because it correctly handles serialized PHP data (which a plain SQL UPDATE will corrupt for any plugin storing arrays).
# Copy the dump from source to new host
scp source-user@source-host.com:/tmp/wp-db-*.sql.gz \
    ~/wp-db.sql.gz

# Decompress
gunzip wp-db.sql.gz

# Import into the new database
mysql -u wp_user -p wp_target < wp-db.sql

# Update wp-config.php with new DB credentials
sed -i "s/define( 'DB_NAME', .*/define( 'DB_NAME', 'wp_target' );/" ~/public_html/wp-config.php
sed -i "s/define( 'DB_USER', .*/define( 'DB_USER', 'wp_user' );/" ~/public_html/wp-config.php
sed -i "s/define( 'DB_PASSWORD', .*/define( 'DB_PASSWORD', 'strong_password_here' );/" ~/public_html/wp-config.php

# Fix the site URL with wp-cli (only run if the URL is changing)
cd ~/public_html
wp search-replace 'https://oldsite.com' 'https://newsite.com' \
    --skip-columns=guid \
    --recurse-objects \
    --all-tables-with-prefix

# If the domain stays the same but you're on a temp URL, search-replace
# from the temp URL back to production after DNS cutover.
The --skip-columns=guid flag is critical. The guid column in wp_posts should never be changed because RSS feeds, WordPress’s own deduplication logic, and some legacy plugins use guid as a stable identifier. Changing it breaks RSS subscriptions silently.
The --recurse-objects flag tells WP-CLI to deserialize, search, replace, and re-serialize PHP objects. Without it, plugins that store arrays in wp_options (most page builders, most cache plugins, some SEO plugins) will have broken serialized data and silent fatals.
Step 5: Test the migrated site on a staging URL
Before flipping DNS, verify the migrated copy works. Most managed hosts give you a staging URL (like your-site.kinsta.cloud or your-site.wpengine.com) that bypasses DNS. For self-managed VPS, edit your local /etc/hosts file to point your domain at the new server’s IP for testing without affecting other visitors.
# On macOS/Linux, edit /etc/hosts
sudo nano /etc/hosts

# Add a line pointing your domain at the new server IP
123.45.67.89  yoursite.com  www.yoursite.com

# Flush DNS cache
# macOS:
sudo dscacheutil -flushcache; sudo killall -HUP mDNSResponder
# Linux:
sudo systemctl restart systemd-resolved
Now your browser will hit the new server when you visit yoursite.com, while every other visitor still hits the old host. Click through every page type: homepage, a blog post, a category archive, the contact form, the search results, /wp-admin login. Anything that breaks here will break for real visitors after DNS cutover.
- Homepage loads with no PHP errors in the response
- A random blog post loads with images and styling intact
- /wp-admin login works and shows the dashboard
- Permalink structure works (no 404s on post URLs)
- Image uploads via Media Library save to the new server
- Contact form submission works (test with a real submission)
- Search returns expected results
- Sitemap.xml renders correctly
- Email-out tests work (password reset, comment notification)
Step 6: Cut over DNS to the new host
You should have lowered the DNS TTL to 300 seconds 24 hours ago (in the pre-migration checklist). Now update the A record at your DNS provider to point at the new server’s IP address. Resolvers that honor the short TTL pick up the change within minutes; a few cache longer, which is why the old host stays live.
# Verify DNS propagation from your local machine
dig yoursite.com +short

# Verify from multiple geographic resolvers
dig @8.8.8.8 yoursite.com +short      # Google DNS (US)
dig @1.1.1.1 yoursite.com +short      # Cloudflare DNS (global)
dig @208.67.222.222 yoursite.com +short  # OpenDNS

# Once you see the new IP everywhere, restore /etc/hosts
sudo nano /etc/hosts  # remove your testing line
If you’re using Cloudflare or another DNS proxy, the cutover is even faster because Cloudflare’s edge already has the new origin IP cached the moment you save the change. Many managed hosts issue a free SSL certificate automatically once DNS points at them. Verify the SSL works before celebrating.
Step 7: Monitor and decommission the old host
Keep the old host live for 14 days as a fallback. If anything goes wrong on the new host you can revert DNS in seconds. After 14 days of stable operation on the new host, with backups running and Search Console showing normal crawl, you can cancel the old host plan.
- Day 1: DNS cutover complete, smoke test passes, SSL valid
- Day 2: Confirm new-host backup ran successfully overnight
- Day 3-7: Monitor Google Search Console for crawl errors and indexing changes
- Day 7: Verify analytics traffic matches your historical baseline within 5 percent
- Day 14: Confirm zero issues for 7 consecutive days, then cancel old host
- Day 14: Save the old host’s final backup locally as a permanent archive
Most migration “failures” actually surface in week two when something breaks that wasn’t caught in the smoke test. A broken cron job that wasn’t migrated. An email-sending plugin still pointing at the old server. A subdomain that still has its A record on the old host. The 14-day fallback window covers all of these.
Common WordPress migration problems and fixes
Three problems show up most often after a WordPress migration. Here’s how to diagnose and fix each.
Mixed content warnings after the move. Hard-coded HTTP image URLs in posts are still HTTP after the migration. Fix with another pass of wp search-replace 'http://yoursite.com' 'https://yoursite.com' --skip-columns=guid. Browser console will show every offending URL.
500 errors on /wp-admin or specific pages. Usually a plugin or theme that depends on a different PHP extension on the old host. Check error logs with tail -f ~/logs/php-errors.log. Typical culprits are plugins requiring SOAP, the old mcrypt extension (no longer part of PHP core), or a specific Imagick version.
Broken permalinks (404 on every post except the homepage). Either .htaccess didn’t transfer (Apache hosts) or the rewrite rules need to be flushed. Fix: visit Settings → Permalinks in /wp-admin and click “Save Changes”. That re-flushes the rewrite rules. On Nginx-based managed hosts the rewrite rules are server-config, not .htaccess; the host’s WordPress recipe handles them automatically.
For deeper hosting context, see my best managed WordPress hosting guide and the best VPS hosting roundup. Both cover the destination platforms most readers migrate to.
Migrating WordPress multisite networks
WordPress multisite migration follows the same pattern with two extra considerations. First, the wp_blogs and wp_site tables contain network-wide configuration that must transfer along with the per-site tables. Second, the new host has to support multisite at the plan tier you are buying. Kinsta, for example, only allows multisite from its $50/month plans, per its pricing page, so check your host’s plan sheet before you buy. Most managed hosts support either subdomain or subdirectory installs but you have to specify which when provisioning.
The search-replace step needs an extra flag for multisite: wp search-replace --network when running on the network’s wp-cli context. Otherwise the replacement only touches the main site’s tables and leaves subsites with the old URLs.
# Multisite-aware search-replace
cd ~/public_html
wp search-replace 'https://oldsite.com' 'https://newsite.com' \
    --skip-columns=guid \
    --recurse-objects \
    --network \
    --all-tables-with-prefix

# Verify each subsite is reachable
wp site list --field=url
# Then curl each URL to confirm it returns 200
Special cases: WooCommerce and large media libraries
WooCommerce stores need maintenance mode during the database cutover window. Otherwise orders placed on the old host after your dump but before DNS cutover will be lost. Turn on WordPress maintenance mode with WP-CLI (wp maintenance-mode activate) for the short cutover window, then deactivate it once the new host is serving traffic.
Large media libraries take hours to rsync. The right strategy is two-pass migration. First pass: rsync everything to the new host while the source is still live. Second pass: a final delta rsync immediately before DNS cutover, capturing only the files modified in the last few hours. The second pass takes minutes, not hours, because rsync only transfers changed files.
# First pass (run a day or two before cutover)
rsync -avz --progress \
    -e "ssh -p 22" \
    source-user@source-host.com:~/public_html/wp-content/uploads/ \
    ~/public_html/wp-content/uploads/

# Second pass: delta sync immediately before DNS cutover
rsync -avz --progress --delete \
    -e "ssh -p 22" \
    source-user@source-host.com:~/public_html/wp-content/uploads/ \
    ~/public_html/wp-content/uploads/

# --delete removes files on target that are gone from source.
# Use with caution; remove the flag if you've added files manually on target.
When to use a managed migration service instead
The manual workflow above is the right choice when you need surgical control or your site is too large for plugin-based migration. For most readers, letting the new host handle the migration is faster and lower-risk. What the main hosts offer in 2026:
- Kinsta: free, unlimited migrations handled by its migrations team (migration page)
- Rocket.net: unlimited free migrations (pricing page)
- WP Engine: a free automated migration plugin on Essential, managed migration services on Core (plans page)
- Cloudways: your first website migrated free, and its migration page advertises free WordPress site migrations
- Liquid Web (which now includes Nexcess): a self-serve migration tool on Essentials, migration by a person on Pro and Elite (plans page)
- BlogVault Migrate Guru: free plugin for sites up to 200 GB, limited to 5 migrations per user per month
For a single-site migration of a typical WordPress blog or business site, letting the host’s team handle it saves you an afternoon of careful work and hands the risk to people who run migrations as their job. That is worth more than a small price difference between hosts.
Post-migration optimization checklist
The migration is the start, not the finish. The first 14 days on the new host are the right time to enable optimizations the old host did not support and validate that performance has actually improved.
- Enable Redis or Memcached object caching if the new host supports it
- Configure server-level page cache (LiteSpeed Cache, Nginx FastCGI, or Kinsta’s built-in cache)
- No server-level cache on the new host? GT Performance (our free GPL plugin) owns page cache and Cloudflare edge rules from one place
- Turn on edge caching if your new host includes it, or set up cache rules on your own CDN
- Verify automatic daily backups are running and downloadable
- Set up uptime monitoring with UptimeRobot or BetterStack
- Submit the new sitemap to Google Search Console and Bing Webmaster Tools
- Run PageSpeed Insights and confirm Core Web Vitals improved vs the old baseline
- Configure 404 monitoring; broken redirects are the most common silent migration regression
For deeper performance work post-migration, see my fastest web hosting guide for the speed stack and the best managed WordPress hosting roundup for platform-specific optimization tips. Each managed host has small differences in how object cache and edge cache are enabled.
Frequently asked questions about migrating WordPress sites
How long does it take to migrate a WordPress site?
A typical WordPress site migration takes 1 to 3 days end to end. The hands-on transfer work takes a few hours for most sites. The bulk of elapsed time is the 24-hour DNS TTL lowering before cutover and the 14-day stability monitoring after cutover. Visitor downtime should be zero.
Will my SEO rankings drop after a WordPress migration?
Not if the migration is done correctly. Keep URLs identical, preserve permalink structure, set up 301 redirects for any URL changes, submit the new sitemap to Search Console, and the rankings stay stable. A migration that keeps every URL identical shouldn’t change organic traffic.
Can I migrate a WordPress site without losing data?
Yes. Always take a full backup before starting. Keep the old host live for 14 days after cutover as a fallback. Use rsync (resume-friendly) for files and mysqldump –single-transaction for the database to avoid corruption. A common cause of data loss is skipping the verification step on the database dump.
What is the best free WordPress migration plugin?
Duplicator Lite and Migrate Guru are the strongest free options. Duplicator Lite advertises backups without size limits but doesn’t support multisite. Migrate Guru is free for sites up to 200 GB, with a limit of 5 migrations per user per month. All-in-One WP Migration is popular too, but unlimited migration size is a premium extension. For very large or unusual sites, use the manual SSH path or the host’s migration team.
Do I need to update the wp-config.php during migration?
Yes. The DB_NAME, DB_USER, DB_PASSWORD, and DB_HOST values in wp-config.php must match the new database. Also regenerate the AUTH_KEY, SECURE_AUTH_KEY, and other unique keys via the WordPress secret-key API at api.wordpress.org/secret-key/1.1/salt/.
Why does WP-CLI search-replace need –skip-columns=guid?
The guid column is a permanent unique identifier for posts that RSS feeds, WordPress’s deduplication logic, and some plugins use as a stable reference. Changing it breaks RSS subscriptions and can cause subscribers to re-receive every post as new. Always preserve guid values across migrations.
Should I lower DNS TTL before a WordPress migration?
Yes. Lower the TTL to 300 seconds at least 24 hours before cutover. This means DNS resolvers that honor the TTL cache the old IP for only 5 minutes, so when you flip to the new IP, most visitors reach the new host within minutes instead of waiting out a long cached record.
Can I migrate a WooCommerce store the same way?
Yes, with one extra step. Put the store into maintenance mode (WP-CLI: wp maintenance-mode activate) for the brief cutover window so no orders are placed on the old host after the database snapshot is taken. Run the migration, then turn maintenance mode off. Keep the order-blocking window as short as you can.
Final notes on migrating WordPress sites cleanly
The hardest part of any WordPress migration is psychological. The actual technical workflow is well-known, well-documented, and reliable when run carefully. Most readers should use their new host’s free team-handled migration; it’s the lowest-risk path and costs nothing on hosts such as Kinsta and Rocket.net, or on your first site at Cloudways. The manual SSH path covered above is for cases where the plugin or team path can’t handle the size or complexity of your site.
Take backups before changes. Lower DNS TTL before cutover. Test on staging before flipping the A record. Keep the old host alive for 14 days as a fallback. Print the migration checklist and tick every box. The combination of these habits is the difference between a clean WordPress migration and a stressful weekend trying to figure out why /wp-admin returns a 500 error. For broader hosting strategy, see my best web hosting guide and the fastest web hosting roundup.
Tell Google you want more of this.
Add Gatilab as a preferred sourceOne tap, and this site shows up more often in your own Top Stories, AI Overviews and AI Mode. Remove it any time.