How to White Label WordPress for Clients

You just built a beautiful WordPress site for a client. They log in for the first time and the first thing they see is the WordPress logo, a bunch of dashboard widgets about WordPress events, and a footer that says “Thank you for creating with WordPress.”
Not exactly the branded experience you promised, right?
White labeling WordPress means replacing all that default WordPress branding with your own. Your logo on the login page. Your welcome message on the dashboard. Your company name in the footer. And most importantly, a clean admin that doesn’t confuse your clients with options they’ll never need.
I’ve been running my agency Gatilab for over 17 years, and we’ve set up white-labeled WordPress dashboards for 850+ client sites. It’s one of the first things we do after launching any project. Takes about 30 minutes, and it completely changes how clients feel about their website.
Let me show you exactly how to do it.
What White Labeling Actually Covers
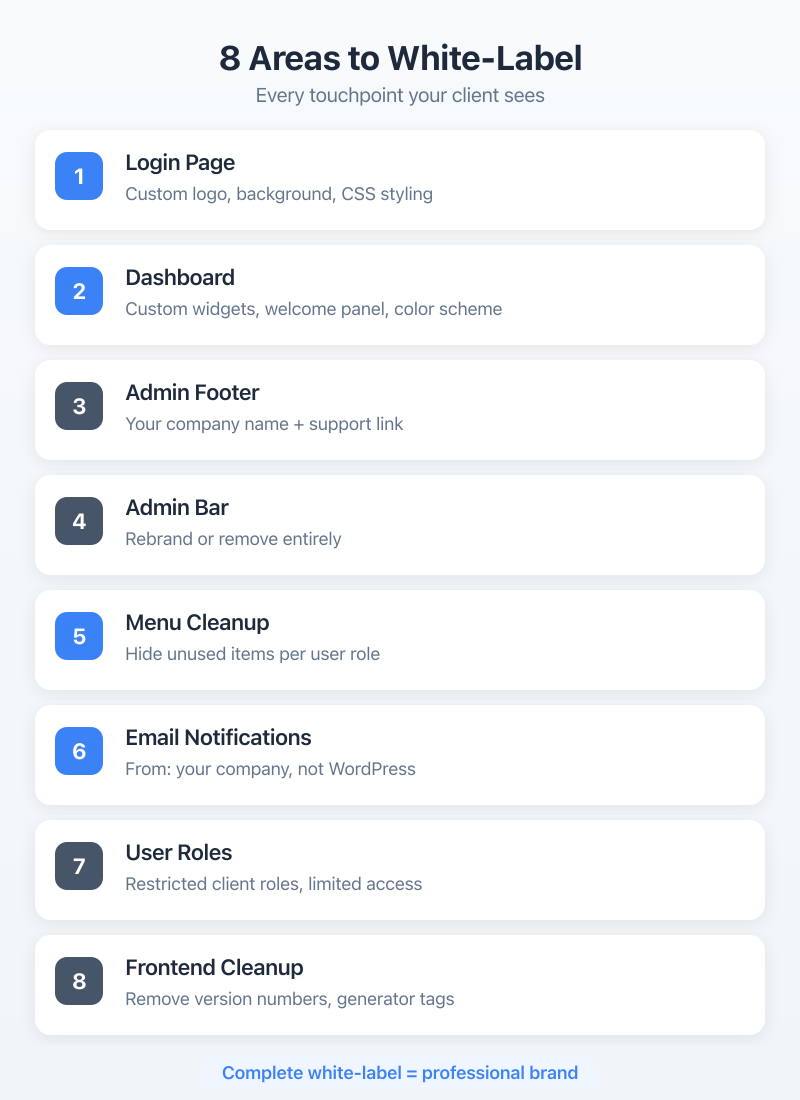
When I talk about white labeling WordPress, I’m talking about these specific changes:
- Login page: Replace the WordPress logo with your client’s logo (or your agency logo)
- Dashboard: Remove default widgets and add your own welcome panel
- Admin footer: Change “Thank you for creating with WordPress” to your own branding
- Admin bar: Clean up or rebrand the top admin bar
- Menu cleanup: Hide menu items your client doesn’t need
- Email notifications: Change the “from” name and email on WordPress emails
- User roles: Create restricted roles so clients can’t break things
- Frontend cleanup: Remove WordPress version numbers and generator tags
You can do all of this with a plugin, with code, or with a mix of both. I’ll cover each approach.
Why White Labeling Matters for Agencies
If you’re freelancing or running an agency, white labeling isn’t optional. It’s part of the job.
Think about it from your client’s perspective. They hired you to build them a website. They’re paying good money for it. And when they log in, they see someone else’s branding everywhere. WordPress logos, WordPress event widgets, WordPress footer credits. It feels generic. It feels like a template. It doesn’t feel like the custom solution they paid for.
White labeling fixes that. Your client logs in, sees their logo, sees a clean dashboard with helpful links you put there, and sees your agency name in the footer with a support link. That’s professional. That’s what they expected.
It also reduces support requests. When clients see a cluttered dashboard full of widgets they don’t understand, they panic. “What’s this Site Health thing? Should I be worried?” Remove the clutter, and those emails stop.
And from a business standpoint, every time your client logs in and sees “Managed by [Your Agency]” in the footer, that’s a branding impression. It keeps you top of mind for future work.
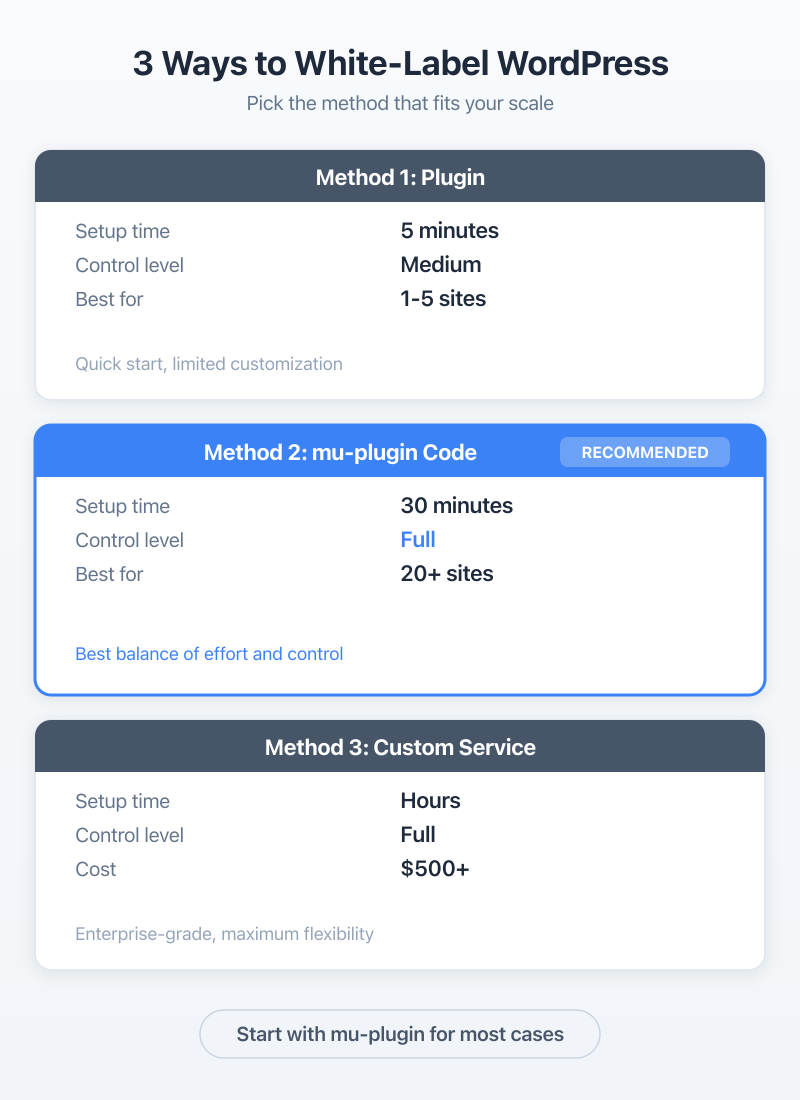
Method 1: The White Label CMS Plugin
If you want the fastest path to a white-labeled WordPress dashboard, the White Label CMS plugin is your best bet. It’s got 200,000+ active installs and it’s been around for years.
Setting It Up
Install and activate the plugin, then go to Settings > White Label CMS. The plugin has a setup wizard that walks you through the basics:
- Login page customization: Upload your logo (or your client’s logo), set a background color or image, and customize the login page CSS if you want to get fancy.
- Dashboard cleanup: The wizard lets you remove all the default WordPress dashboard widgets in one click. No more “WordPress Events and News” or “At a Glance” widgets confusing your clients.
- Custom dashboard panel: Add your own welcome panel with HTML content. I usually put a welcome message, links to the most common tasks (add a new post, edit the homepage, upload media), and a link back to our support system.
- Admin bar and footer branding: Replace the WordPress logo in the admin bar with your own. Change the footer text to something like “Website managed by Gatilab” with a link to your site.
- Menu control: This is the big one. White Label CMS lets you hide entire admin menu sections for non-admin users. Your client doesn’t need to see Plugins, Tools, or Settings? Hide them. They just need Posts, Pages, and Media? Show only those.
What I Like About It
The wizard makes initial setup dead simple. You can have a white-labeled dashboard running in under 5 minutes. The menu hiding feature alone is worth installing it.
Where It Falls Short
The free version covers most use cases, but if you’re managing dozens of client sites, you’ll find yourself configuring it manually each time. There’s no way to export/import settings between sites in the free version. And the login page customization, while decent, is limited compared to what you can do with code.
For single client sites or small agencies, White Label CMS is perfect. For agencies managing 20+ sites, I’d recommend the code approach so you can drop the same mu-plugin on every site.
Other Plugin Options
White Label CMS isn’t the only game in town. A few alternatives worth knowing about:
- Flavor (formerly flavor/flavor-admin) is a lightweight option that focuses on admin theme customization. Fewer features than White Label CMS but less bloat.
- Admin Menu Editor by Janis Elsts is great if your main concern is menu reorganization. It lets you drag and drop menu items, rename them, change icons, and hide them per role. It doesn’t handle login pages or dashboard widgets, but for menu control alone, it’s the best.
- Custom Login Page Customizer is a dedicated plugin just for the login screen. More customization options than White Label CMS for the login page specifically, but it doesn’t touch anything else.
For most agencies, White Label CMS covers enough ground that you don’t need multiple plugins. But if you only need one piece of the puzzle, a focused plugin might be a better fit.
Method 2: Manual Code (The Agency Way)
This is how we do it at Gatilab. We have a custom mu-plugin that we drop into every client site. It handles all the white labeling in one file, and we can version-control it.
Here’s every piece you need.
Custom Login Page Logo and Styles
The login_enqueue_scripts hook lets you add custom CSS to the login page. Here’s how to replace the WordPress logo:
function gatilab_custom_login_logo() {
    ?>
    <style type="text/css">
        #login h1 a, .login h1 a {
            background-image: url('<?php echo get_stylesheet_directory_uri(); ?>/images/client-logo.png');
            background-size: contain;
            background-repeat: no-repeat;
            width: 100%;
            height: 80px;
            background-position: center;
        }
        body.login {
            background-color: #f5f5f5;
        }
    </style>
    <?php
}
add_action('login_enqueue_scripts', 'gatilab_custom_login_logo');
And make the logo link to the client’s site instead of wordpress.org:
function gatilab_login_logo_url() {
    return home_url();
}
add_filter('login_headerurl', 'gatilab_login_logo_url');

function gatilab_login_logo_url_title() {
    return get_bloginfo('name');
}
add_filter('login_headertext', 'gatilab_login_logo_url_title');
Custom Admin Footer Text
Replace the default “Thank you for creating with WordPress” footer:
function gatilab_custom_admin_footer() {
    echo 'Website managed by <a href="https://gatilab.com">Gatilab</a>. Need help? <a href="mailto:[email protected]">Contact support</a>.';
}
add_filter('admin_footer_text', 'gatilab_custom_admin_footer');
You can also remove the WordPress version from the right side of the footer:
function gatilab_remove_version_footer() {
    return '';
}
add_filter('update_footer', 'gatilab_remove_version_footer', 9999);
Custom Dashboard Widgets
Remove the default widgets and add your own:
function gatilab_custom_dashboard_widgets() {
    // Remove default widgets
    remove_meta_box('dashboard_quick_press', 'dashboard', 'side');
    remove_meta_box('dashboard_primary', 'dashboard', 'side');
    remove_meta_box('dashboard_site_health', 'dashboard', 'normal');
    remove_meta_box('dashboard_right_now', 'dashboard', 'normal');
    remove_meta_box('dashboard_activity', 'dashboard', 'normal');

    // Add custom welcome widget
    wp_add_dashboard_widget(
        'gatilab_welcome_widget',
        'Welcome to Your Website',
        'gatilab_welcome_widget_content'
    );
}
add_action('wp_dashboard_setup', 'gatilab_custom_dashboard_widgets');

function gatilab_welcome_widget_content() {
    echo '<p>Welcome to your website dashboard! Here are some quick links:</p>';
    echo '<ul>';
    echo '<li><a href="' . admin_url('post-new.php') . '">Write a new post</a></li>';
    echo '<li><a href="' . admin_url('post-new.php?post_type=page') . '">Create a new page</a></li>';
    echo '<li><a href="' . admin_url('upload.php') . '">Manage media</a></li>';
    echo '</ul>';
    echo '<p>Need help? Contact us at <a href="mailto:[email protected]">[email protected]</a></p>';
}
Hide Admin Menu Items
Your clients don’t need to see Plugins, Tools, Appearance (if they shouldn’t be changing themes), or Settings. Here’s how to hide them for non-admin users:
function gatilab_remove_admin_menus() {
    if (!current_user_can('manage_options')) {
        return;
    }

    // Only hide menus for non-super-admin users
    if (!is_super_admin()) {
        remove_menu_page('plugins.php');
        remove_menu_page('tools.php');
        remove_menu_page('options-general.php');
        remove_menu_page('themes.php');
        remove_menu_page('edit-comments.php'); // if they don't use comments
    }
}
add_action('admin_menu', 'gatilab_remove_admin_menus', 999);
Wait, let me correct that. The logic should check if the user is NOT a super admin or your developer account:
function gatilab_remove_admin_menus() {
    // Get the current user
    $current_user = wp_get_current_user();

    // Skip menu removal for our agency accounts
    $agency_emails = array('[email protected]');

    if (in_array($current_user->user_email, $agency_emails)) {
        return;
    }

    // Hide menus for everyone else
    remove_menu_page('plugins.php');
    remove_menu_page('tools.php');
    remove_menu_page('options-general.php');
}
add_action('admin_menu', 'gatilab_remove_admin_menus', 999);
This way, you always have full access, but your clients see a clean, simplified menu.
Custom Admin Bar
Remove the WordPress logo from the admin bar and add your own:
function gatilab_custom_admin_bar($wp_admin_bar) {
    // Remove WordPress logo
    $wp_admin_bar->remove_node('wp-logo');

    // Remove unwanted items
    $wp_admin_bar->remove_node('comments');
    $wp_admin_bar->remove_node('new-content');
    $wp_admin_bar->remove_node('updates');
}
add_action('admin_bar_menu', 'gatilab_custom_admin_bar', 999);
Method 3: Custom User Roles for Client Access
The default WordPress roles aren’t great for client handoffs. An Administrator can do everything: install plugins, switch themes, edit code. That’s dangerous for clients who don’t know what they’re doing.
I always create a custom “Client Manager” role that has just enough permissions to manage content without breaking things.
Creating a Client Manager Role
function gatilab_add_client_role() {
    add_role('client_manager', 'Client Manager', array(
        'read'                   => true,
        'edit_posts'             => true,
        'edit_published_posts'   => true,
        'publish_posts'          => true,
        'delete_posts'           => true,
        'delete_published_posts' => true,
        'edit_pages'             => true,
        'edit_published_pages'   => true,
        'publish_pages'          => true,
        'delete_pages'           => true,
        'delete_published_pages' => true,
        'upload_files'           => true,
        'manage_categories'      => true,
        'moderate_comments'      => true,
        'edit_others_posts'      => true,
        'edit_others_pages'      => true,
        'delete_others_posts'    => true,
        'delete_others_pages'    => true,
    ));
}
register_activation_hook(__FILE__, 'gatilab_add_client_role');
This role can manage all content (posts, pages, media, categories, comments) but can’t install plugins, change themes, modify settings, or access tools. It’s the sweet spot for most clients.
Using the Members Plugin
If you don’t want to write code for role management, the Members plugin by Justin Tadlock gives you a visual interface for creating and editing roles. You can check and uncheck capabilities, clone existing roles, and assign multiple roles to users.
I use Members on sites where the client might need slightly different permissions over time. It’s easier to adjust through the UI than to redeploy code.
Cleaning Up Email Notifications
This one gets overlooked all the time. WordPress sends emails for password resets, new user registrations, comment notifications, and more. By default, they all come from “WordPress” with the email “[email protected].”
Change the From Name and Email
function gatilab_mail_from_name($name) {
    return 'Client Website';
}
add_filter('wp_mail_from_name', 'gatilab_mail_from_name');

function gatilab_mail_from_email($email) {
    return '[email protected]';
}
add_filter('wp_mail_from', 'gatilab_mail_from_email');
Disable Unnecessary Admin Emails
WordPress sends the site admin an email every time a user changes their password or email. For most client sites, these are noise:
// Disable admin email for password changes
add_filter('wp_password_change_notification_email', '__return_false');

// Disable new user notification to admin
add_filter('wp_new_user_notification_email_admin', '__return_false');
Be selective with these. You might want to keep some notifications active depending on the site. But for a simple business website where the client is the only user? Disable the noise.
Removing WordPress Traces From the Frontend
The backend is clean. Now let’s clean up the frontend too.
Remove the Generator Meta Tag
WordPress adds a meta tag to your site’s HTML that broadcasts the version number. That’s a security risk and it screams “this is WordPress”:
remove_action('wp_head', 'wp_generator');Remove WordPress Version From Scripts and Styles
WordPress appends version numbers to CSS and JS files. Remove them:
function gatilab_remove_version_strings($src) {
    if (strpos($src, 'ver=')) {
        $src = remove_query_arg('ver', $src);
    }
    return $src;
}
add_filter('style_loader_src', 'gatilab_remove_version_strings', 9999);
add_filter('script_loader_src', 'gatilab_remove_version_strings', 9999);
Remove REST API Link and oEmbed
If you want to go further:
remove_action('wp_head', 'rest_output_link_wp_head');
remove_action('wp_head', 'wp_oembed_add_discovery_links');
remove_action('wp_head', 'wp_oembed_add_host_js');
Don’t remove REST API links if your site relies on REST API calls from the frontend. This is just for sites that don’t need external REST access.
My Agency Workflow: The Gatilab Checklist
Here’s exactly what we do on every client site at Gatilab. We’ve turned this into a standard mu-plugin that we drop into /wp-content/mu-plugins/ on every site:
- Create the mu-plugin file:
gatilab-white-label.phpgoes intowp-content/mu-plugins/. MU plugins load automatically and can’t be deactivated by clients.
- Custom login page: Client’s logo, clean background, link goes to their homepage.
- Dashboard cleanup: Remove all default widgets, add our welcome widget with quick links and support contact.
- Footer branding: “Managed by Gatilab” with support link.
- Menu hiding: Remove Plugins, Tools, and Settings for non-agency accounts.
- Custom role: Create “Client Manager” role, assign it to the client’s user account.
- Email branding: Change from name and email to match the client’s domain.
- Frontend cleanup: Remove generator tag, version strings.
We keep this mu-plugin in a Git repo and deploy it with a simple scp command. Every new client site gets the same professional treatment in about 5 minutes.
The reason we use an mu-plugin instead of adding code to functions.php is simple: mu-plugins can’t be accidentally deactivated by the client. They load before regular plugins. And if the client switches themes, the white labeling stays intact.
Bonus: Hiding the WordPress Update Nag
If you’re managing client sites, the last thing you want is your client seeing “WordPress 6.x is available! Please update now.” in big yellow banners. They’ll either click it and break something, or email you asking what to do.
Hide update notifications for non-agency users:
function gatilab_hide_update_nags() {
    $current_user = wp_get_current_user();
    $agency_emails = array('[email protected]');

    if (!in_array($current_user->user_email, $agency_emails)) {
        remove_action('admin_notices', 'update_nag', 3);
        remove_action('admin_notices', 'maintenance_nag', 10);
    }
}
add_action('admin_head', 'gatilab_hide_update_nags', 1);
You should still keep WordPress updated. But you should be the one doing it, not your client. This just removes the nagging so they don’t worry about it.
You can also hide plugin update counts from the menu:
function gatilab_hide_update_counts() {
    $current_user = wp_get_current_user();
    $agency_emails = array('[email protected]');

    if (!in_array($current_user->user_email, $agency_emails)) {
        global $menu, $submenu;
        // Remove update count from Plugins menu
        if (isset($menu[65])) {
            $menu[65][0] = 'Plugins';
        }
    }
}
add_action('admin_menu', 'gatilab_hide_update_counts', 999);
Quick Note About Going Too Far
One thing I want to mention: don’t hide so much that your client can’t do their job. The whole point of WordPress is that non-technical people can manage their own content. If you hide everything, they’ll email you every time they need to add a blog post.
Find the balance. Hide the stuff that could break things (Plugins, Tools, Settings). Keep the stuff they need (Posts, Pages, Media, Comments if applicable). And always include a clear support link so they know where to go when they’re stuck.
Wrapping Up
White labeling WordPress isn’t complicated. Whether you go with the White Label CMS plugin for a quick setup or build your own mu-plugin like we do at Gatilab, the result is the same: a professional, branded experience that makes your clients feel like they’re using a custom-built system.
It takes maybe 30 minutes to set up, and it lasts for the entire lifetime of the client relationship. That’s one of the best return-on-time investments you can make as a WordPress agency.
Start with the login page. That’s the first thing your client sees every time they log in. Get that right, and the rest will follow.